Be warned this is post is overloaded with photos!!!
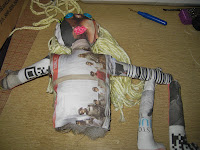
Here is part one where I started the doll. After cutting the pattern pieces out of fabric, I finished the face with embroidery floss and buttons.
After sewing the strips of yarn hair extensions to the fabric, the next step was to sew everything together.
I tucked the hair inside and pinned all of the fabric pieces together with the images facing each other.


The most difficult part in all of this is turning the legs and arm turned right side out. I used a paintbrush, plastic yarn needle embroidery scissors and a seam ripper. I have never figured out a smooth technique,
but the seam ripper is my favorite tool, even though you risk piercing holes in the fabric.
After getting all of the limbs right side out, I filled them with poly-fill and then sewed them to the torso of the doll.
After the arms were sewn to the torso, Yvette (my sewing machine) and I sewed up the edges, and then got to my least favorite part, turning the entire doll right side out.

Turning the doll inside out was a workout! I even had to rip a seam in the neck to create extra ease to release all of her hair. I stitched up the hole and then filled her with poly-fill. I used a locking hem stitch to do the repair.
I realized that the torso was a little too short and she looked off balanced, so I added an extension, and then sewed on her legs, and re-filled her torso with poly-fill.
I gave her a hair cut, and made her a tutu. Check out the next post to see the final results!


No comments:
Post a Comment